How To Hunt With Snares Plus 6 How To Traps
Hunting and snaring are very old skills that have been passed down from generation to generation, with each generation adding a little something to it. At the same time we loose a little of that knowledge by modern advancements and the lack of needing to use these skills. I am not saying technology is bad for hunting and trapping, I’m sure if our ancestors had there hands on some of the gadgets that we have now, they would have loved it. Life would have been a little easier. But there is something about knowing what they knew and recreating it.
Hunting and snaring are great skills to have or to learn. Being able to provide food for your family and others is a great thing. So, I want to share with you six snares that are pretty easy to learn and the best thing about them, they are very effective.
((Trapping is illegal in most places. Be sure you know the law in your area and trap responsibly.))
Here are the top six best snares to learn.
Lock Spring Snare:
The materials you will need to create this snare are one stick (stick A) around 2 foot long and about an inch in diameter, another stick (stick B) around 6 to 8 inches long, 2 lengths of cordage (preferably steel line 22 gauge, but fishing line, string or even shoelaces, if that’s all you have, will work) and a stick (stick C) for the spring around 6 feet long. Now you can omit this stick (stick C) if you are in an area where you can use a branch or a small tree as the spring.
On the 2 foot long stick (stick A) cut a notch about a 1/2 inch deep and an inch long. Start this notch around an inch down from one of the ends of the stick. The other end, sharpen the stick so it can pierce and be driven into the ground.
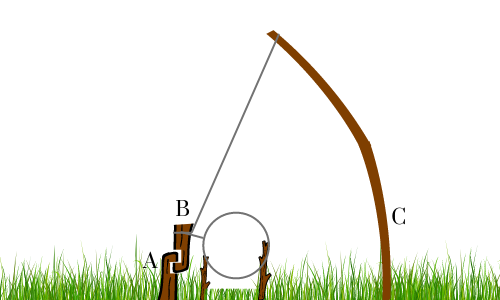
Cut a similar notch into the shorter stick (stick B) about a half an inch down from one end. On the other end make a shallow V notch around the whole stick. This is just a notch for the line to be tied to more securely.
Cut your first stretch of line around 2 and 1/2 foot long and the second measure of line will be cut to length when the time comes. Tie a figure 8 loop knot on one end of the line (If you don’t know how to make this knot Watch This Video and take the other end and put it through the loop. Now you have your noose that can tighten up around your target animal.
If you haven’t already you need to select where you are going to place your trap. Usually this is not a baited trap, so you will want to place it at the opening of a den or along an animal trail.
Just off the animal trail drive your longer stick (stick A) into the ground with the notch facing toward the trail. Then, if you are using a stick (stick C) for your spring, notch a V around the stick about 5 inches down from the end, to better hold your line and sharpen the other end to be driven into the ground.
If you are going to use a small tree or limb, you will want to remove the branches. This will give you a faster recoil time when the trap is set off. Then notch a V around the limb to secure the line.
Tie the beginning of the second line around the V notch of the limb or your longest stick (stick C). If using the longest stick, drive it into the ground around 4 feet away from the animal trail. Pull the limb or stick (stick C) down toward the first stick (stick A) you drove into the ground. When it has a good bit of tension on the line, note where the line is in relation to the top of the stick (stick A) and cut the line there.
Lift your limb or stick (stick C) back up and tie the line around the V notch on the small stick (stick B). On that same V notch tie the end of your noose line. Pull over your limb or stick (stick C) and bring the notches of the two sticks (sticks A and B) together. Place some small sticks into the ground along side the animal trail as a setting for the noose to hang. Keep in mind the height of the animal you’re after. You can add debris on the sides of your trap, basically funneling, to make sure the animal goes through your trap, but don’t make it too obvious. If you do, they will know something’s up and go around it.
Y Promontory Dead Fall:
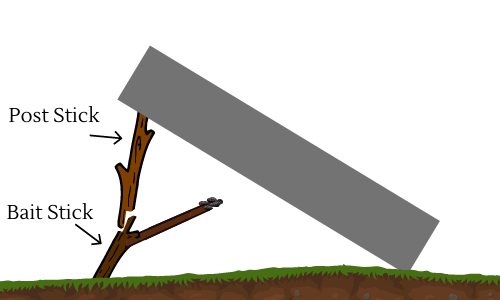
The materials you will need for this snare are one stick (called Bait stick) that is in the shape of a Y and around an inch in diameter and about a foot long, a heavy rock or piece of wood that is flat on one side, another stick (called Post stick) that is about a foot long and an inch in diameter.
To start out you will want to make a 1/2 inch deep notch an inch above the Y on the side of the Bait stick facing the outside of the Y. Traveling up the stick, not following the branch off that makes up the Y, travel up only about an inch and cut it off. Next, start from the tip of the notch to where you cut off the stick and remove this material. You will want to round your edges so nothing will catch when the trap is triggered. Also take the end of your Y and sharpen it. This will hold your bait. You should end up with something that looks like this figure.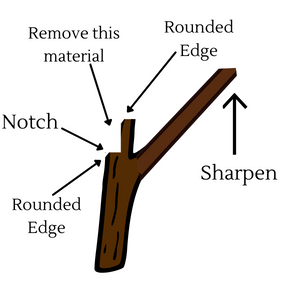
Taking one end of your other stick (Post stick) and about an inch down cut a notch into about 1/2 inch deep. Remove the material from the tip of that notch to the end of your stick and round the edges. You will end up with a post stick looking similar to this figure.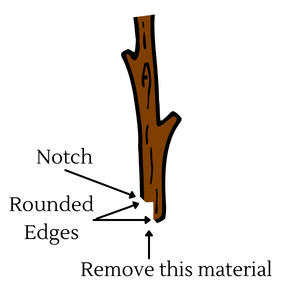
Now find a heavy object with as flat of surface as you can. Your bait stick will go down first, if the soil is too loose or sandy you can put down a flat rock or piece of wood to keep your bait stick from sinking. Bait your stick at the sharpened end of the Y, then set the notch from the post stick into the notch of the bait stick. Balance the heavy object onto the top of the post stick.
The reason for the Y stick is that the branch coming off your bait stick puts the bait further under the heavy object, meaning the animal will have to be further under it, making the chances of getting your target animal greater. Gravity will keep them together until something comes along and tries to grab the bait. Then the two pieces of sticks will come apart and the object will come down to kill your dinner.
Hopi Bird Snare:
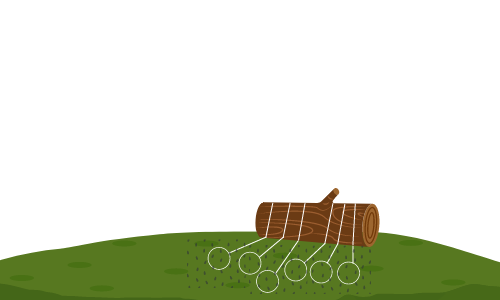
This a very simple and effective snare originally used by Native Americans. The materials you will need are twine and decent size rock or log.
First pick out your log or rock you will be using as an anchor. Then cut your twine into 6 pieces. Each piece being long enough to tie around your anchor and to leave around 2 foot of slack. Tie each piece of twine around your anchor leaving some space between each piece. On the other end tie a slip knot. If you don’t know how to tie a slip knot Watch This Video.
Place each loop made from the slip knot in front of the anchor on the ground. You can throw some dirt on the twine to give it some camouflage. Now add your bait. Throw some seeds around the loops and wait. When the birds come to get the seeds their feet will get caught up in the loops and when they try to get away, it will tighten up on their feet and will be waiting for you when you check the traps.
Squirrel Pole Snare:
This also is a great simple snare to set up for squirrels. Squirrels are more likely to run up a branch that is leaning against a tree than to start at the base and work up. So this trap takes advantage of their behavior. The materials you are going to need is some kind of line, steel wire, twine, paracord or something similar. If you use something other than wire then you are going to do a little bit additional work. The other thing you are going to need is a branch leaning against a tree. This can be found in the woods or you can lean a branch against a tree. Bait is optional.
Once you have identified your leaning branch, cut your trapping wire into 4 pieces. Tie one end around the branch making sure it is securely attached. On the other end tie a slip knot and place it just above the branch. If you are using steel wire it should have enough structure to keep itself in position. If you are using string, paracord or something other soft material, you will need to push some twigs into the crevasses of the branch and drape your noose from that. If there are not any natural crevasses then take your knife and make some small holes.
You can bait just beyond each of your noose traps with peanut butter, seeds or anything you have to entice the critters and increase your chances of success.

Native American Fish Snare:
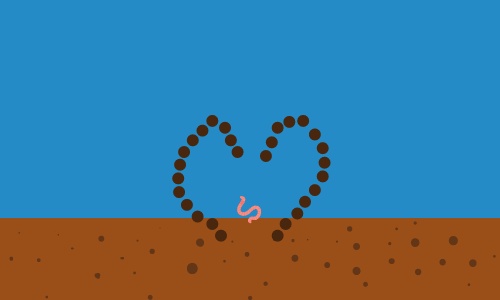
This is a simple fish trap that will help you put dinner on the table. The materials you need are a lot of sticks, bait and a lake, pond or stream.
Start out by collecting a lot of sticks about 2 to 3 foot long. Pick a place out along the bank that you can access easily. You are going to take your sticks and make 2 half circles and connect them with a V, almost like the shape of a heart. Look at the figure below to see the exact shape. The sticks should be very close together and deep enough into the mud to keep a fish contained.
Next you will want to place bait near the bank of the trap. This could be leftovers of cleaning fish, worms, grasshoppers or anything else you have or can find. If your bait is alive you will need to secure it. One way of doing this is by splitting a section of a stick and placing the bait in there, then placing it under the water. Fish will swim into the V for the bait and will not be able to get out.
Pitfall – big or small game:
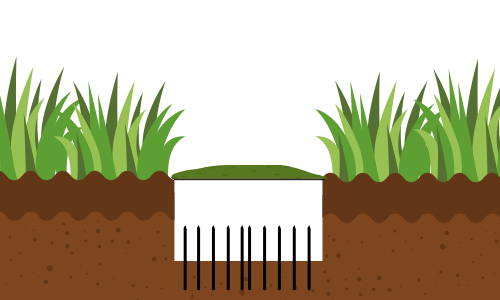
The pitfall snare is one that goes back to a long time ago. It’s basically just digging a big hole. So your material list will be a tool to dig, some leafy limbs, time and patience. Sticks will be optional.
You start out by locating deer or other big game trails, but this trap can be used for any size animal, even insects. Depending on what you are going after, dig the length and width accordingly. You will want to begin digging somewhere in the middle of that trail. Dig deep enough so the animal can’t jump out.
You do have an option of not digging it so deep if you use some sticks. If you’re using some sticks you will want to dig down about 4 feet. Take several sticks about an inch or better in diameter and sharpen the end to be driven into the ground. After driving 10 to 12 sticks into the ground and having them stick up about 2 feet from bottom of the pit, sharpen the other end to a fine point.
Finally, camouflage the hole with some netting and leaves or leafy limbs. It is always a good idea to let other people know this is a pitfall trap and to stay clear.
I hope you enjoyed this article and was able to take something away from it. Remember to check your local laws about trapping and hunting.
Discover Wilderness Wisdom That Could Save Your Life